Showing posts with label Desserts. Show all posts

Thursday, January 5, 2012

My Biggest Fan... Bakes!!!!


I've made a decision.... Anyone who makes one of my recipes and sends me pictures as proof will get their own blog post. My best friend Elina has made 2 recipes already... My rugelach cookies and my double chocolate cookie!!! Apologies Elina, for not recognizing your baking talents earlier.

Elina is the kind of friend that everyone dreams of, few people meet and a handful get to keep. She is the friend that quieted my sobs over the phone and endlessly laughed with me on her couch. The only friend who to this day I can have as good a time watching reality tv as I could in the hottest nightclub. She has been the one person who supports me in everything I do and yet at the same time can tell me the truth about everything!

So in short, Elina deserves a lot more than a post... But at this point that's what she gets and it comes from the warmest, gooeyist, place in my heart.... Warm and gooey kinda like these cookies :)

She has recently started baking and was looking for a new cookie recipe. I told her to make my Chocolate Cookies with White Chocolate Chips. She is the kind of cook everyone can only hope for because she follows directions to a T. At 5:38 today my phone rang.... Elina was in a frantic panic... She was short a package of chocolate chips!!! I ran from work and picked her up a bag of chocolate chips; I was greeted by her sniffling toe head toddler, Emma. (more on this pile of adorableness in another post)
She finished baking the cookies, even with multiple sniffle interruptions from the toddler. 15 cookies and a generous serving of guilt later... I found myself sitting on the couch licking off the last crumbs off of my lips. Those cookies were as I had remembered them... Elina you are my hero... Sniffle monster and all!

Wednesday, November 16, 2011

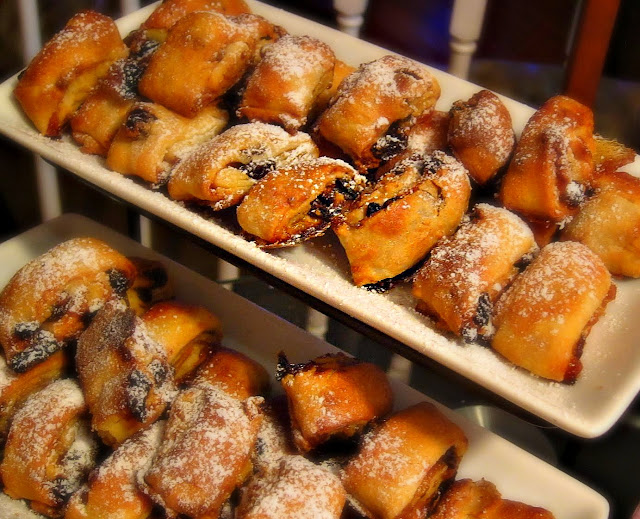
Dreams Of Rugelach


I admit...I CAN bake...it's just I do not always want to...But there is that one dessert that I make that is truly MY dessert. Everyone asks for MY recipe...Everyone doubles over in delight after eating MY creation...Everyone gains about 2 pounds after eating MY dessert.

This is how this magical dessert was born...
I was unemployed...depressed and bored. I was sitting on the couch, doing nothing more than watching the Food Network. Ina Garten comes on screen and starts making these amazing little cookies. My ears perked up and my mouth started salivating. "I can do this," I thought. Reluctant to fail, I followed the recipe to a T. However, when the dough was not ending up quite how I like it, I tweaked it a bit. And they ended up AMAZING! I ate ten myself and I decided these posed a major threat to my figure! I passed the delicious little love handle makers to my husband and told him to take them to work the very next day.
At 10am the next day I get a phone call from a crazed best friend. She said her husband told her he had eaten the most amazing cookies that my husband brought into work and that I must make more! So I made more and invited her over. She drove over in an hour and was eating them still hot. The sweetest thing she said was, "It's like you put something in them that makes them absolutely irresistible! I cannot stop eating them." The following day her father-in-law tasted them...and chaos ensued! They all literally sat with their hands folded at the table and waited for my fresh batch of cookies for hours and immediately devoured them!
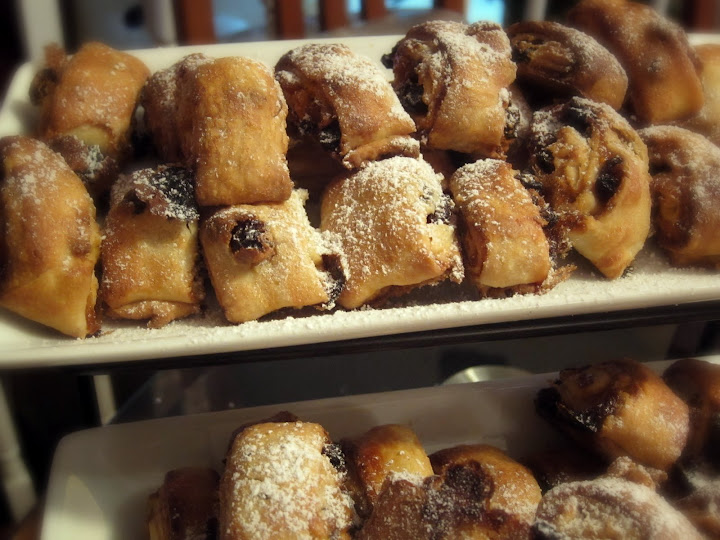
So now I finally pass them on :) I use the recipe below as more of a guide than anything else. Most rugelach look like little crescents. I shape mine a little differently because it's easier to cut them.
As far as the preserves goes, I have used everything from apricot, to strawberry to cherry. I personally enjoyed the strawberry, but in my kitchen everyone is a critic and the vast majority prefer the apricot.
The beauty of these little cookies is how versatile they are. Make them as I do or make them yours...whatever it is share them...it's a sin not to...


Rugelach


8 ounces cream cheese, at room temperature
1/2-pound unsalted butter, at room temperature
1/4 cup granulated sugar plus 9 tablespoons
1/4 teaspoon kosher salt
1 teaspoon pure vanilla extract
2 cups all-purpose flour
1/4 cup light brown sugar, packed
1 1/2 teaspoons ground cinnamon
3/4 cup raisins
1 cup walnuts, finely chopped
1/2 cup apricot preserves, pureed in a food processor
1 egg beaten with 1 tablespoon milk, for egg wash

*You can double this recipe and save the dough in the fridge for a week for a rainy day*

Directions
Cream the cheese and butter in the bowl of an electric mixer fitted with the paddle attachment until light. Add 1/4 cup granulated sugar, the salt, and vanilla. With the mixer on low speed, add the flour and mix until just combined. Dump the dough out onto a well-floured board and roll it into a ball. Cut the ball in quarters, wrap each piece in plastic, and refrigerate for 1 hour. *I have also used a food processor to make the dough and it worked great.*
To make the filling, combine 6 tablespoons of granulated sugar, the brown sugar, 1/2 teaspoon cinnamon, the raisins, and walnuts.

On a well-floured board, roll each ball of dough into a 9-inch circle. Spread the dough with 2 tablespoons apricot preserves and sprinkle with 1/2 cup of the filling. Press the filling lightly into the dough.
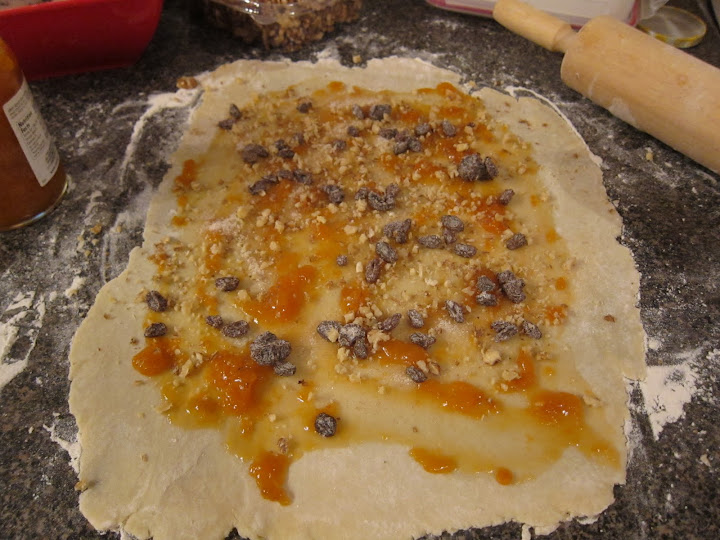


Roll up the dough carefully like a jelly roll, making sure to tuck the corners under.
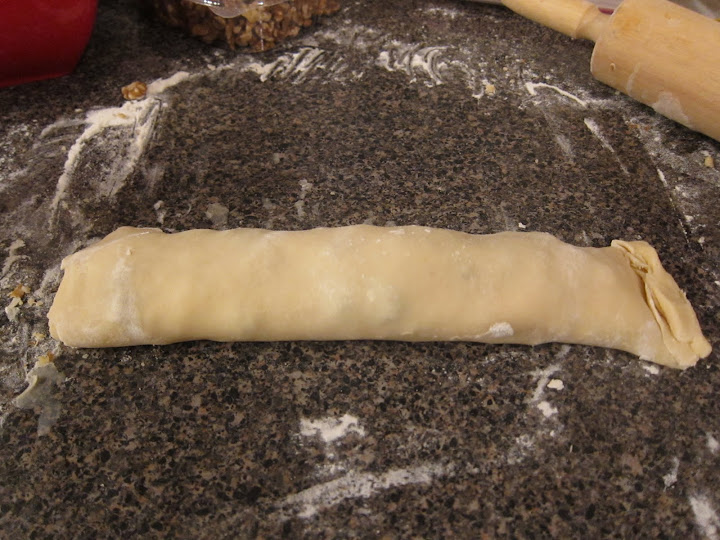


Cut into 2 inch pieces and place face up on a baking sheet lined with parchment paper. *Make sure you use parchment paper, when the jam boils out it creates a sticky mess*
Chill for 30 minutes.

Preheat the oven to 350 degrees F.


Brush each cookie with the egg wash. Combine 3 tablespoons granulated sugar and 1 teaspoon cinnamon and sprinkle on the cookies. Bake for 15 to 20 minutes, until lightly browned. Remove to a wire rack and let cool.
*Sometimes it takes longer for the cookies to bake. Just monitor them carefully.*

Monday, April 19, 2010

Holy Peaches!!!


Fooled Ya! If it looks like a peach, it must be a peach right? NOPE!

8 years ago my brother and sister-in-law had the most amazing wedding...and with it came an incredible sweet table. The one dessert that I remember and that unfortunately the bride and groom never tasted were these beautiful little peach looking cookies. I guess the past has a way of resurfacing :) I was at the in-laws house last week and my mother-in-law made these beautiful peach looking cookies. They were gigantic but none the less amazing! So I vowed to make my own, at the very least so that my brother and sister in law could have some :) They tasted exctly like I remembered at the wedding...Delicious! They are a tad bit time consuming but totally worth it! The look on everyones' faces when they saw those little imitations was priceless!


Peach Shaped Cookies


Ingredients
1 cup white sugar
1 Stick of butter, softened
2 Tablespoons Sour Cream
2 eggs
3/4 teaspoon baking powder
1/2 teaspoon vanilla extract
3 2/3 cups all-purpose flour (You may have to keep adding flour until the dough is firm enough)
1 hazlenut for each whole cookie made
2 Cans of Dulce de Leche
*If the store does not have Dulce de Leche, go ahead and use sweetened condensed milk and boil in its cans for 2 hours.*

For the dying of the cookies:
2 bowls of milk, one colored with red food coloring, the other with yellow.
1 bowl of sugar (abour 1/2 a cup)

Directions
1. Heat your oven to 350°.
2. Lightly grease cookie sheets.
3. Mix together the sugar, eggs and butter. Add flour and baking powder.
4. Form 1" balls by rolling them in your hand and placing on the cookie sheet. Make sure the balls are a bit flat on the bottom where the rest on the cookie sheet.
5. Bake until bottoms of cookies are lightly browned, about 15 minutes.

6. While they are still warm, with a knife, scoop out the inside of each cookie and save the crumbs.
7. Combine sweetened condensed milk with the reserved crumbs and the 2 tablespoons of Cognac.
8. With a teaspoon, fill a half with the filling and one hazlenut. Take another half and smoosh together to make one whole peach. (The hazlenut adds for a surprise on the inside)
9. Dip each whole peach into the red food coloring first, then the yellow. Let them dry for about 10 minutes and then roll in the sugar.


Voila beautiful peach cookies! The more you practice the more beautiful they will get!

Monday, April 5, 2010

Chocolate Lover's Dream: Flourless Chocolate Nutella Cake


Now I know...I know...this cake sounds REALLY evil but I made it for a good cause...It was Passover last week and I had to bring dessert. I thought of making creme brulee again, but it's not that easy to make individual desserts for 18 people. So I decided to actually bake. Now I think I have made it clear that I do not bake. Oddly enough, recently I developed a liking to baking; in fact I really enjoy it! So I decided to make something with simple flavors but that will please all different pa lattes! CHOCOLATE! I find it hard to believe that there is anyone out there that does not like chocolate; so it was a pretty easy choice. I found a recipe I used in culinary school and added a very magical ingredient to it: NUTELLA! Nutella, the delicious hazelnut and chocolate spread is fluffy, creamy goodness. The addition of the Nutella and a touch of coffee was a perfect compliment to this chocolaty goodness!

Flourless Chocolate Nutella Cake
*Just an FYI, this cake is so dense that it could probably feed more like 20-25 people.*

Cake

6 large eggs- separated
1 Tsp Instant Coffee
1 stick soft unsalted butter
1 jar of Nutella
1 tablespoon Kahlua
1 Cup finely ground hazelnuts
4 ounces bittersweet chocolate, melted

Ganache Topping
1/4 cup crushed hazelnuts
1 cup heavy cream
4 oz bittersweet chocolate

*Preheat oven to 325 degrees and butter a 9-inch spring form pan.

1. Melt your chocolate over steam or in a double broiler.
2. Place the jar of nutella in the microwave for 30 seconds to loosen it up a bit.
3. In a mixer, combine butter, coffee, Kahlua and Nutella...make sure to scrape out every bit of that goodness!
4. With the mixer on low, add in the egg yolks one at a time, making sure each is incorporated before adding the next.
5. Add in the melted chocolate and combine.
6. In another mixing bowl, whisk the egg whites to stiff peaks. Slowly fold in the egg whites into the chocolate mixture.
7. Pour into the pan and bake for about 50-60 minutes or until top has set.
8. While the cake is baking, make the ganache by bringing the cream up to a high simmer.
9. Turn off the heat and stir in the chocolate until melted.
10. Once the cake is ready, let it cool for 10 minutes. Then remove from pan and let cool completely on a cooling rack.
11. Once cooled pour the ganache on the cake and smooth out. Sprinkle with hazelnuts and slice yourself a piece!

Tuesday, March 16, 2010

White Chocolate Creme Brulee with Macerated Berries


A couple of weeks ago a friend of mine asked me to teach him a few recipes. So I was on a mission to create a nice gourmet yet simple menu. Everything was going smoothly until I came down to dessert. I could not think of anything that would really be simple but completely impressive. So I asked my friend, "Name one dessert you would love to learn how to make?" He paused and then replied, "Creme Brulee!"
Of coarse I agreed and went to work on a recipe. However, the words creme brulee did not equal easy in my mind...until I looked at the recipe. OMG there was nothing to it!

Now the one ingredient that I believe makes a simple creme brulee special is s fresh vanilla bean. I was actually able to find them a lot easier than I though. Both Williams and Sonoma and The World Market had them. In fact, I also bought the Little ramekins for the creme brulee at The World Market as well for a much better price than any other store I went to that day. The best part of using the vanilla bean in a creme brulee is when you get to the bottom of the ramekins you see the little black dots from the vanilla bean...and everyone started asking what it was!

I served some really simple macerated berries alongside the creme brulee and we had an amazing simple and delicious dessert!

White Chocolate Creme Brulee

6 large egg yolks
6 tablespoons sugar
1 vanilla bean, split lengthwise
1 1/2 cups whipping cream
4 oz white chocolate chips
12 teaspoons raw or cane sugar


1. Preheat oven to 325-degrees.
2. Scrape the vanilla bean seeds out of the bean and make sure you get every last bit!
3. Over medium heat combine the heavy whipping cream, vanilla seeds and the vanilla bean; bring to a simmer.
4. In a separate bowl combine the sugar with the egg yolks and whisk to combine.
5. Once the cream mixture comes to a heavy simmer, begin tempering the eggs: with a ladle add in some of the cream mixture into the eggs and whisk. Do this 2 more times. This will allow for the eggs to reach temperature slowly and not curdle. Once tempered, add the mixture back into the pot.
6. Add the white chocolate to the pot and over low heat, slowly whisk the mixture, making sure the chocolate melts.
7. Pour mixture into a measuring cup through a strainer to catch the vanilla bean and any pieces of egg that may have curdled.
8. Arrange ramekins in a 13x9x2-inch baking pan. Pour enough hot water into pan to come halfway up sides of dishes.
9. Pour custard into each ramekin and divide equally.
10. Bake for 50-60 minutes or until set in center.
11. Refrigerate for a couple of hours or until ready to serve, at least 1 hour.
12. If you have a flame torch, like myself this makes for an exciting activity for the guests to do. Just sprinkle the raw sugar on top of the creme brulee right before service flame them! If you do not have a flame torch, (you should invest in one, they are very impressive and not that expensive!)then just stick them under the broiler with the sugar sprinkled on top until nice and golden brown!

Macerated Berries

1 pint strawberries
1 pint blackberries
1 pint blueberries
1 pint blackberries
1/4 cup Amaretto Disarrono
1/4 cup sugar

1. Combine all ingredients in a bowl and toss to combine. Let rest for at least an hour and serve with your favorite dessert!

Wednesday, February 24, 2010

Upside Down Apple Cake


A couple of weeks ago my fiance bought me some apples. Cute and little they were, but their flavor was more reminiscent of cardboard than apples. So instead of throwing them out, I decided to make some baked goods with them. I have recently run into quite a bit of free time and have decided to give baking another shot. It seems like it's that time of the year again where I will bake frantically for 2 or 3 weeks straight and then vow to never do it again!

I found a nice and easy upside down apple cake recipe. It was extremely easy to put together and actually quite impressive looking! It does require making a quick caramel and some coring and slicing of apples. I tweaked the recipe a bit to add some more zing to it and it turned out fabulous! I was quite proud of myself. I will add this though: make sure you take the caramel to that perfect amber stage. Thinking that the residual heat will finish it in the pan, I turned it off and it turned out a bit too light. The next time I make this, I will be sure to take the caramel to a darker stage.

*I found that because the cake uses caramel and there is sugar in the batter, that it was a bit too sweet. In the recipe below I have adjusted the amount of sugar so that it is not that sweet.*


Ingredients
6 tablespoons (3/4 stick) unsalted butter, at room temperature, plus extra for greasing the dish
1 1/4 Large Apples, Peeled and Sliced
1 1/4 cups granulated sugar, divided
2 extra-large eggs, at room temperature
1/3 cup sour cream
3/4 teaspoon grated lemon zest
1/2 teaspoon pure vanilla extract
1 cup plus 2 tablespoons all-purpose flour
1/2 teaspoon baking powder
1/4 teaspoon kosher salt


1. Preheat the oven to 350 degrees F.
2. Generously butter a 9-inch glass pie dish and arrange the apples in the dish.


3. Combine 1 cup of the granulated sugar and 1/3 cup water in a small saucepan and cook over high heat until it turns a warm amber color, making sure the entire time you DO NOT stir the caramel, this will cause crystallization.
4. Pour evenly over the apple slices.
5. Cream the 6 tablespoons of butter and the remaining 1/4 cup of granulated sugar in the bowl of an electric mixer fitted with the paddle attachment, until light and fluffy.
6. Lower the speed and beat in the eggs 1 at a time.
7. Add the sour cream, zest, and vanilla and mix until combined.
8. Add the flour, baking powder, and salt. Mix only until combined.
9. Pour the cake batter evenly over the apple slices and bake for 30 to 40 minutes, until a cake tester comes out clean.
10. Cool for 15 minutes, then invert the cake onto a flat plate. Serve warm or at room temperature with vanilla ice cream.

*I actually ran out of regular granulated sugar and ended up using raw cane sugar in the batter instead. The batter still came out great! *

Tuesday, February 24, 2009

Chocolate Cookies with White Chocolate Chips


Back in high school, every day for breakfast, I would go to the school cafeteria and have 3 amazing warm, gooey chocolate cookies with white chocolate chips. It was the the highlight of my day, every day. Do you remember those days when you could eat whatever you want and not gain an ounce? I had this way of stuffing anything into my body and still retaining a perfect, perky figure, wish I had it that easy today :) To this day I never found a recipe for cookies that tasted like those did. Today, as I was folding laundry, I caught an episode of Barefoot Contessa. She was reminiscing all her favorite chocolate recipes...and there they were... my beloved White Chocolate Chunk Chocolate Cookies! (Now I am sure that the ones at school were made from some frozen mystery cookie dough) I was instantly inspired and made them this evening. I didn't have any chocolate chunks, but I did have some white chocolate chips, so I just used 12 oz of those.

Now I will be honest...I have NEVER been good at baking cookies. I ALWAYS over baked them because I thought they were still raw inside, turns out they just had to cool :)
I followed Ina's instructions exactly and they were PERFECT! I ate three of them on my own! (Diet? What diet...) I am going to bring them to my fiance's work tomorrow so they can enjoy them as much as I did! (And so that I can get those tempting little devils out of my house!)

Here is Ina's recipe:

Chocolate White Chocolate Chunk Cookies

40 to 48 cookies Ingredients
1/2 pound unsalted butte,r at room temperature
1 cup light brown sugar, packed
1 cup granulated sugar
2 teaspoons pure vanilla extract
2 extra-large eggs at room temperature
2/3 cup good unsweetened cocoa
2 cups flour
1 teaspoon baking soda
1 teaspoon kosher salt
1 1/2 pounds good white chocolate, coarsely chopped
Directions
Preheat the oven to 350 degrees F.

Cream the butter and both sugars until light and fluffy in the bowl of an electric mixer fitted with the paddle attachment. Add the vanilla, then the eggs, 1 at a time, and mix well. Add the cocoa and mix again. Sift together the flour, baking soda, and salt and add to the chocolate with the mixer on low speed until just combined. Fold in the chopped white chocolate.

Drop the dough on a baking sheet lined with parchment paper, using a 1 3/4-inch ice cream scoop or a rounded tablespoon.


Dampen your hands and flatten the dough slightly. Bake for exactly 15 minutes (the cookies will seem underdone). Remove from the oven and let cool slightly on the pan, then transfer to a wire rack to cool completely.


PROOF!

Thursday, January 8, 2009

Barefoot Bloggers: Banana Sour Cream Pancakes


Alright...I will admit it...I am a procrastinator. I've been bad...very bad and very busy and therefore waited till the very last minute to post my pancakes. I will admit that I actually made them for dinner and we just munched on them. But my fiance' will be having them for breakfast tomorrow which so that counts right?
As all of Ina's recipes are, this one was very good. I did however change one thing. I did not like the whole idea of just placing the bananas on the pancake while they cooked. So I decided to do a more gourmet version of this pancake. My take is Banana Fosters Sour Cream Pancakes. I took some sugar, butter, diced up bananas, Cognac and voila, you have pancakes that will make anyone happy. Now I completely understand that you would not want to serve this to your children, I promise the intention of this blog is not to booze up the kiddies. If serving this to kids, just take out the Cognac it will taste just as fabulous!

So here it is... very first Barefoot Bloggers post...I hope I made Ina proud!


Banana Sour Cream Pancakes

1 1/2 cups flour
3 tablespoons sugar
2 teaspoons baking powder
1 1/2 teaspoons kosher salt
1/2 cup sour cream
3/4 cup plus 1 tablespoon milk
2 extra-large eggs
1 teaspoon pure vanilla extract
1 teaspoon grated lemon zest
Unsalted butter

Sift together the flour, sugar, baking powder, and salt. In a separate bowl, whisk together the sour cream, milk, eggs, vanilla, and lemon zest. Add the wet ingredients to the dry ones, mixing only until combined.

Melt 1 tablespoon of butter in a large skillet over medium-low heat until it bubbles. Ladle the pancake batter into the pan to make 3 or 4 pancakes. Cook for 2 to 3 minutes, until bubbles appear on top and the underside is nicely browned.

Flip the pancakes and then cook for another minute until browned. Wipe out the pan with a paper towel, add more butter to the pan, and continue cooking pancakes until all the batter is used.

Banana's Foster Topping

2 ripe bananas, diced
1 stick butter
3 tablespoons sugar
1/4 cup Cognac
juice of 1/2 a lemon
1/2 a cup pecans, crushed


1. Place butter and sugar in saute pan and let it dissolve on medium heat.
2. Add bananas and cook for 2 minutes.
3. Add Cognac...if you are feeling a bit adventureous or want to impress guests go ahead and flambe: meaning tilt the pan to the flame a bit and your Cognac will cathch on fire. I promise this is sure to be a hit with everyone.
4. Turn off heat and add lemon juice.
5. Spoon over pancakes and add pecans.

Monday, December 29, 2008

White and Dark Chocolate Bread Pudding


I love bread pudding! I always have! It's comforting, easy and always a crowd pleaser. At least it always was with my clients. This was the first time that I made bread pudding for my family and friends. My God, the faces I got when I started serving this up to them! They looked at me and we're all like, "Umm no thanks, we'll pass on that." I was like, "No, this is good, try it." They all waived their heads "no" in unison. So I shoved a spoonful into my best friend Marina's, mouth, and she was like, "Oh my God! This is amazing...wow!" And then they all joined in!

I don't remember where I got this recipe but I tweeked it a lot. To the point where now, it really is my recipe. I served it up with plain whip cream out of the bottle. I forgot to buy whipping cream so I had no time to make my own. I also just had some last night and I put it together with vanilla ice cream. It was delicious!


White and Dark Chocolate Bread Pudding


1 loaf of Hawiian Bread
6 ounces bittersweet (not unsweetened) or semisweet chocolate, chopped
6 ounces imported white chocolate, chopped
4 large eggs
1/2 cup plus 4 tablespoons sugar
2 teaspoons vanilla extract
2 cups whipping cream
1/2 cup whole milk
Nonstick vegetable oil spray


1. Combine bread, chocolate, and white chocolate in large bowl and toss to blend.
2. A hand whisk, beat eggs, 1/2 cup plus 2 tablespoons sugar, and vanilla in another large bowl to blend. Gradually beat in 1 1/2 cups cream and milk.
3. Add cream mixture to bread mixture; stir to combine. Let stand 30 minutes.
4. Preheat oven to 350°F. Spray 13x9x2-inch glass baking dish with nonstick spray.
5. Transfer bread mixture to prepared dish, spreading evenly. Drizzle with remaining 1/2 cup cream. Sprinkle with remaining 2 tablespoons sugar.
6. Bake the pudding until edges are golden and custard is set in center, about 1 hour. Cool pudding slightly.
*I actually cooked the bread pudding for 30 minutes the night before. Then on the day of the party I stuck it into the oven while we were having dinner. By the time we were ready to eat dessert, the chocolate was all gooey and melted!*