Showing posts with label Italian. Show all posts

Wednesday, December 14, 2011

BBQ Chicken Flatbread Pizza


I love cooking for my husband. He has a hearty appetite and is a very honest critic of my food - which can lead him down the wrong path might quickly... When I asked what he wanted for dinner on a cold Friday night, he said " make me something crispy, gooey and cheesy.". Quite the combination to ask for on the night when the fridge is running low on pretty much everything except condiments and leftovers, (some of which are questionable). I had a little bit of roasted chicken breast left, some random herbs and a pantry full of miscellaneous items. The perfect concoction popped into my head once I saw my Costco size bottle of BBQ sauce.... Flatbread Pizzas!!!! Crispy... Cheesy.... Gooey.... Perfect combo not to mention super easy! This recipe literally took me all of 30 minutes to make and really put a smile on the hubby's face. I thought this was very close to the BBQ Chicken Pizza at California Pizza Kitchen and therefore patted myself on the back for a job well done :)
The BBQ sauce plays a very crucial role in this dish. I strayed from my usual Sweet Baby Ray's and chose to go with Masterpiece BBQ sauce, it was both tangy and spicy, precisely what I wanted for the pizza. Gooey, Cheesey, Tangy, Crispy...Perfect for our Friday night on the couch.

BBQ Chicken Flatbread Pizza

The flatbreaf recipe is an oldie but a goodie that I used 2 years ago in one of my other recipes. You can find some of my other recipes that I made with them here .

Serves 4 as an appetizer or 2 as an entree

Flatbreads

1 3/4 cups unbleached all-purpose flour
1 tablespoon chopped rosemary
1 teaspoon baking powder
1/4 teaspoon salt
1/2 cup water
1/3 cup olive oil plus more for brushing
*Preheat oven to 450°F with a heavy baking sheet on rack in middle. I used a pizza stone instead.

2 Cooked Chicken Breasts, Shredded, tossed in 1/2 a cup of BBQ Sauce of Choice *I had left over chicken breasts, use whatever kind you have on hand, or just roast some up with salt and pepper and olive oil in the oven*
1 Cup Good BBQ Sauce
1 Red Onion, Sliced
2 Cups of Shredded Cheese * I used a Pepperjack Cheddar Mix, Italian blend would work well too*
1 Bunch Cilantro, Roughly Chopped

1. Stir together flour, chopped herbs of choice, baking powder, and salt in a medium bowl.
2. Make a well in center, then add water and oil and gradually stir into flour with a wooden spoon until a dough forms. Knead dough gently on a floured work surface a few times.
3. Divide dough into 3 pieces and roll out 1 piece on a sheet of parchment paper into a 10-inch round. Make sure you cover the others with plastic wrap so they don't dry out.
4. Lightly brush top with additional oil and scatter small clusters of rosemary leaves on top, pressing in slightly. Sprinkle with sea salt. Slide round with parchment paper onto preheated baking sheet and bake until it is a pale golden color, about 8 to 10 minutes. Transfer flat bread to a rack to cool, then make 2 more rounds (1 at a time) on fresh parchment.
5.Since I was making them right away with my toppings...I took out one of my oven racks ahead of time and used that as my cooling rack. That way, I could just assemble flat bread and stick them back in the oven.
*Flatbread can be made 2 days ahead. Just cool it completely, and keep it in an air tight container at room temperature.*
6. Once flatbreads are cooked and cool to handle you can assemble the flatbreads. Shmear BBQ sauce on the flatbreads with a pastry brush. A nice layer to cover all the bubbling nooks and crannies will do.
7. Sprinkle 1/3 of shredded chicken, 1/3 cheese and (yup you guessed it) 1/3 of the sliced red onions on the already shmeared flatbread.
8. With a spoon, drizzle a bit more BBQ Sauce on the flatbread (hey they don't call it BBQ Pizza for nothin')

9. Place into the preheated oven for 10 minutes, or until cracklin and bubblin!
10. Sprinkle with plenty of cilantro and serve!

Wednesday, November 16, 2011

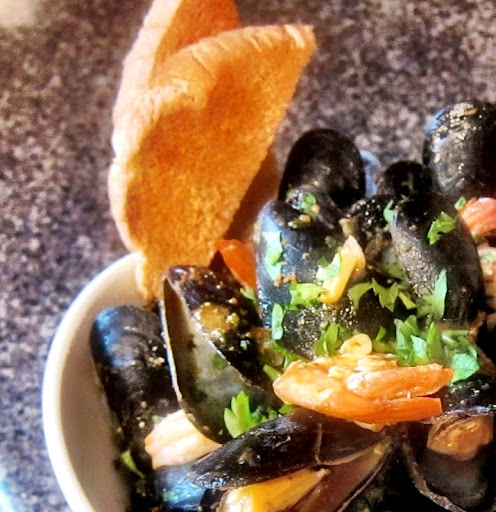
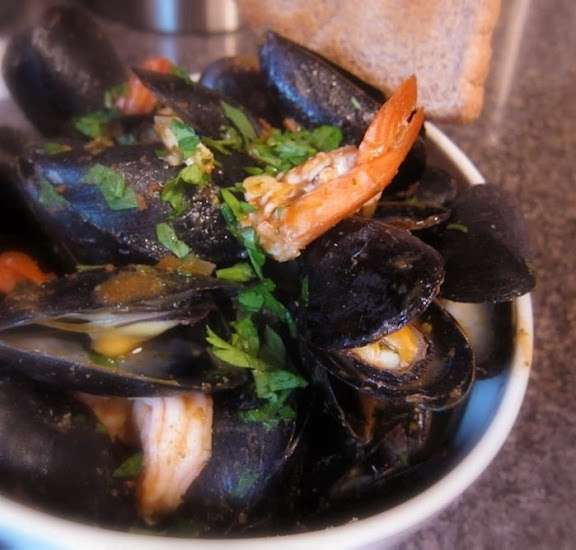
Tuscan Mussles and Shrimp


Very few things in life give me as much pleasure as putting a smile on people's faces with my food. Particularly, my husband's face :) Those days that he is down and out and needs a pick me up...I know the shortest distance is to his stomach! 90% of the time this remedy calls for seafood; my husband’s favorite food of all time. I was on the phone with my husband shopping at my favorite grocery store when I noticed that he was not in a particularly pleasant mood. I knew this called for an arsenal of seafood!
This particular dish I made on a warm September afternoon. I wanted to make him something healthy yet still allow him to feel like he indulged. The dishes’ simple flavors combine and form an incredible broth perfect for dipping a whole wheat crostini into.

Tuscan Mussels and Shrimp
* Like all seafood mussels can be extremely dangerous if they are not fresh. Sorting through them is crucial. Stick them under cold running water and pick through, discarding any shells that refuse to close. If they are open then they are already dead. Scrub the remaining ones with a sponge to remove any access dirt. They all have a grassy looking "beard" attached to their shells, tear that off as well.*

1 Pound of Mussels, Washed and Sorted
6 Large Shrimp; Shells and Veins Removed
4 Large Garlic Cloves; Minced
1 Shallot Diced Finely
Juice of Half a Lemon
3 Scallions Sliced on the Bias
2 Tablespoons Chopped Parsley
1 Cup of Wine
1/2 Cup Canned Diced Tomatoes
1 Pinch Red Pepper Flakes
2 Tablespoons Olive Oil
2 Pieces of Whole Wheat Bread, Toasted, Rubbed Down with Garlic Cloves
Salt and Pepper to Taste


1. In a wide and deep pot combine olive oil, shallots, garlic and red pepper flakes. Allow to sweat for a couple of minutes until fragrant and transparent, but not brown.
2. Add in shrimp and sautee for two minutes.
3. Add in mussels, white wine, tomatoes, lemon juice and scallions; toss everything to combine. Cover with tight fitting lid and allow to cook for 4 minutes untouched.
4. Remove lid and move everything around, if all the mussels are opened, poor into a deep bowl, sprinkle with parsley and serve with toasted bread!
Dip, slurp and enjoy!

Wednesday, March 17, 2010

White Bean and Escarole Soup with Meatballs


It may be getting warmer but my soup addiction is still going strong!
In fact I may be the only person I know that can eat soup in the middle of summer while sitting outside in the heat! Since I was a kid soup was always a way for my mom to make me eat lots of veggies and calories. Now, it's actually recommended for people who are on a restricted calorie program! I know that years ago when I was on Weight Watchers, they recommended to eat a cup or bowl of veggie soup before each meal to fill up. It worked! I always ate less when I had that bowl (or 2) of veggie soup!

Yesterday, I really wanted something fulfilling and full of greens for dinner. So while watching LOST (yes I'm a lostee) I made myself this really healthy and filling soup. It's a healthy twist on an Italian classic. I used nice, lean ground turkey to make the little meatballs and homemade chicken broth I had frozen from some leftover chicken soup. It was delicious, hearty and really healthy!


White Bean and Escarole Soup with Meatballs

Meatballs

1 Pound Lean Ground Turkey
1 Egg
3 Tablespoons Chopped Parsley
2 Minced Garlic Cloves (On my microplaner of coarse)
1/4 Cup Freshly Grated Parmesano Reggiano
Salt and Pepper

Soup

6 Cups of Chicken Stock, homemade or boxed
2 Cups Chopped Escarole
1 Can Cannelini Beans
1 Diced Onion
Juice of 1 Lemon
2 Tablespoons Olive Oil
1/4 Cup Rice

1. For the meatballs: Combine all the ingredients in a bowl and roll into little balls; reserve.
2. Add olive oil to a pot and sweat the onions. You do not want them to get brown, just nice and translucent.
3. Add chicken stock to the pot and bring to s simmer.
4. Once the soup simmers add in the meatballs and rice. Simmer for 20 minutes and add in beans, escarole and lemon juice.
5. Serve with freshly grated cheese of your choice!

Tuesday, March 16, 2010

Smokey Pasta with Scallions and Escarole


I love pasta and like most people I like it with a delicious creamy sauce. Which of coarse translates to dreamy love handles :) I have been trying to create a healthier cream sauce. And after many failed attempts...I finally got it! The key is ricotta. When the ricotta is pureed with a touch of milk, you get an amazing, delicious, creamy and thick sauce!

This pasta dish in particular is simple with a lot of complex flavors. It uses three pork products, pancetta, prociutto and bacon! Now while the ricotta makes the sauce a bit healthier, the pork products certainly does not...however once in awhile one has to be bad :) The added sweetness from red onions balances out the dish beautifully. I still have a taste in my mouth from this incredible pasta!

Smokey Pasta with Chicken and Escarole

1 pound whole wheat rigatoni or penne pasta
2 oz Prociutto, thinly sliced
2 oz Pancetta, thinly sliced
2 oz Smoked Bacon, thinly sliced
1 red onion, thinly sliced
2 cups escarole, thinly sliced
2 scallions, sliced
1 cup of ricotta
2 tablespoons of milk
2 garlic cloves
1/2 a cup Parmesano Reggiano
1 tsp of olive oil
freshly cracked black pepper

1. Cook the pasta according to package instructions. Drain and set aside. Reserve 1 cup of the pasta water for use later.
2. Add the tsp of olive oil to a pan and add in the prociutto, pancetta and bacon.
Sautee the bacons until nice and crispy. Remove from pan.
3. Add in red onions and scallions and cook over medium heat until tender.
4. In a blender, food processor or Magic Bullet, combine the ricotta with the milk, parmesan cheese and garlic until smooth.
5. Lower the heat and add in ricotta mixture and pork products. Add pasta and escarole and toss to coat. The escarole will wilt nicely from the heat of the pasta. * If the sauce is too thick add a bit of pasta water to thin it out.
6. Serve with a few cracks of freshly cracked pepper.

Thursday, August 6, 2009

Whole Wheat Spaghetti and Turkey Sausageballs


In the midst of all my healthy cooking, I started to crave one of my favorite comfort foods, Spaghetti and Meatballs. However, since I am trying to eat lighter and spend less time in the kitchen, I wanted to see how I can make this recipe healthier and quick. The answer: Turkey Sausage! In any market today there are a variety of gourmet chicken and turkey sausages. Cosco has an assortment of chicken sausages including feta and spinach, sun-dried tomato and artichoke and garlic pesto. With all the different types of sausages available the recipe creations are infinite!

I noticed that my grocery store had Italian turkey sausage on sale. So I thought to myself, "hmmmm why not make meatballs out of sausage???" It makes perfect sense! All the flavors are already in there, all I have to do is remove the casing and roll out little meatballs. With a few additions to the sausage I created an extremely quick and lip smacking good meal!

Whole Wheat Spaghetti and Turkey Sausageballs

1 Package Hot Italian Turkey Sausage (about 6 links)
1 Jar of Trader Joes Organic Marinara
1 Package Whole Wheat Pasta
1/4 Cup Freshly Grated Parmesan Cheese
1/2 Onion Finely Diced
2 Tablespoons Fresh Parsley, Finely Chopped
2 Garlic Cloves, Minced
5 Basil Leaves, Chiffonade

1. Take the sausages out of their casings by making a slit down the middle of them, lengthwise. Place a pot of salted water to boil for the pasta.
2. Add Parmesan, onion, parsley and mix well with hands to combine.
3. Create little meatballs and place on an oiled baking sheet.


4. Bake at 450-degrees in a convection oven for 10-15 minutes or until golden brown on the outside.
5. While the meatballs bake, cook the pasta and warm up the sauce with the garlic and basil in a saucepan.
6. Once the meatballs are a beautiful golden brown, add them to the sauce to finish cooking.
7. When the pasta is al dente, drain, toss with the sauce and add meatballs. Garnish with more Parmesan cheese and enjoy... Bellisimo!

Wednesday, February 18, 2009

Chicken Marsala


My fiance' loves chicken marsala because of all the mushrooms. I found that one of the key elements to a really great chicken marsala is to get some really deep color in the flavor. With mushrooms, the darker they get, the more intense the flavor is. Also, a little tip for browning your mushrooms: DO NOT put salt in until the end. Salt draws out moisture and moisture will prevent that caramalization process.
I served this over a really yummy garlic and Parmesan polenta. I had the polenta...and my fiance' had the marsala. It was a great dinner :)
*Even though the dish is called "chicken Marsala" I actually didn't notice that I ran out of Marsala wine. I substitued a sweet Sherry and some dry white wine. It turned out just as great!*


Chicken Marsala

1.5 Pounds Chicken Cutlets
1 10 Oz Package of Crimini Mushrooms
1 Shallot, Chopped Small
1/2 Cup Sherry Wine (or Marsala of course)
1/2 Cup Dry White Wine
1/4 Cup Chicken Stock
Olive Oil
Salt and Pepper

1. Season chicken cutlets liberally with salt and pepper.
2. Heat olive oil in a large pan until it is hot.
3. Sear chicken on both sides until it develops a nice crust.
*Traditionally, the chicken cutlets are dredged in flour and then seared. However, I am trying to stick to a healthier diet. If you get the pan hot enough and let the chicken brown, you will not miss the flour at all.*
4. Remove the chicken to another plate.
5. Reduce heat to medium high and add shallots, add olive oil if necessary. Scrape the bottom of the pan with a rubber spatula or wooden spoon and scrape up the bottom to remove all the yummy bits.
6. Add the mushrooms and continue sauteeing until nice and rich in color, about 15 minutes.

7. Pour in wine and sherry. Let reduce by half and add chicken stock. Season with salt and pepper.
8. Add in chicken and finish cooking; about 5 minutes.
*If the sauce is too thin, mix in some flour so that it thickens.*

Sunday, February 15, 2009

Balsamic and Basil Chicken Quarters


I needed something extremely quick an simple for dinner one night. I had some chicken quarters that I wanted to use up. I stuck them in the marinade in the morning and it was ready to go for me in the evening. The sugar in the balsamic vinegar caused the skin to roast and crisp up beautifully! This was the closest that I have ever gotten to the flavor and texture of a rotissire chicken. I honestly think it had to do with the marinade as well as the roasting process. My fiancee could not stop raving about the chicken. I served it up with some whole wheat orzo with garlic, basil and tomatos. Later in the week I used one of the leftover chicken breasts in a simple garbage salad. Nothing more to say here, this dish was simple and delicious.

1 Whole Chicken, Cut up into Wuarters
2 Tablespoons Chopped Fresh Basil
2 Cloves of Garlic, Minced
1/4 Cup Balsamic Vinegar
2 Tablespoons Olive Oil
1 Tablespoon Garlic Powder
1 Tablespoon Onion Powder
Salt and Pepper to Season
1 Plastic Bag


1. Place all ingredients into plastic bag. For at least 12 hours.
2. Set oven to "ROAST" at 450-degrees.
3. Place chicken parts on a roasting pan on the middle rack in the oven. Roast for about 25-30 minutes or until juices run clear.

*See...I told you it was simple :)

Saturday, February 14, 2009

My Favorite Minestrone


There are probablly as many recipes for Minestrone soup as there are for chocolate chip cookies. Minestrone literally translates to "Big Soup." It's a very simple dish, typically containing vegetables in season, meats on hand, beans and rice or pastas. Several years ago I worked at a really great Italian restaurant. They had the best minestrone soup...THE BEST! It wasn't only the flavor that was so unique but the texture. There was a unique technique that they used to thicken the soup which also changed the color. I was so excited when I finally learned how to duplicate the sou from the restaurant! The minestrone was filling and low cal, a perfect combination!

1 Large Onion, Chopped
2 Medium Carrots, Chopped into Half Moons
2 Stalks of Celery, Sliced
1 Yellow Squash, Cut into Half Moons
5 Stewed Tomatoes and 1/4 Cup of its Juice
1 Can of Cannolinni Beans
3 Cloves of Garlic, Thinly Sliced
3 Pieces Smoky Bacon, Sliced
1/8 Tsp Red Pepper Flakes
5 Quarts Chicken Stock
Salt and Pepper to taste
Olive Oil


1.In a heavy bottomed pan, pour 1 tsp olive oil and add in the bacon. On medium heat, sweat out the bacon so all the oils come out.
2. After the fat has sweated out of the bacon, add in the onion, carrots, celery and garlic. Toss to coat with the bacon.
3. Add in the chopped tomatoes and the tomato juice.
4. Add in your chicken stock and bring to a boil.
5. Take 1/4 of the beans and place in a blender or food processor. With a ladle, pour in about one cup of the soup and the veggies into the blender. Blend until a smooth puree. Stir in the mixture slowly into the soup, this will thicken the soup slightly.
6. Add in the rest of the beans, squash and red pepper flakes. Simmer on low heat for 30 minutes.
7. Season to your liking and enjoy!!!

Monday, January 5, 2009

An Oldie But a Goodie: Spaghetti and Meatballs


Ahhh spaghetti and meatballs, one of my all time faves! I swear, I always said that if I wasn't Russian I would be Italian! I love Italian food! Whether it's traditional Italian or Italian American, like this particular dish is, I can't get enough!
It's funny that in America we serve spaghetti with meatballs. In a traditional Italian family you would never see that happen. Here is a bit of a history lesson: When Italians emigrated to America, they never ate the two together. Sure they ate pasta and they ate meatballs, but mixing the two together did not start until they started serving it to a non-Italian clientele in some of the restaurants they opened in their communities. Italy is one of the few countries who enjoys their pasta or rice separate from their protein. Italians found that their other clientele needed to have both the protein and the starch together...and so Bada Bing Bada Boom Spaghetti and Meatballs were born!
Clearly, this is not one of the most healthiest dishes out there. However, after careful research and development in my own kitchen, I have found ways to keep it healthier and not sacrifice any of the flavor. I have also discovered a much quicker way to make this hearty meal. I used to talk to all the Italians I knew and get their mom's and grandma's recipes for spaghetti and meatballs and I cooked all day, just like the real Italian grandmothers. After I finished scrubbing the kitchen from all the tomato sauce splatters, I thought, "There must be another way." And there was! Of coarse with the help of Trader Joes Marinara I was able to create a wonderful meal in a little over an hour! I'm sure that there is an Italian grandmother right now (or her family) reading this and shaking her head in horror. Relax grandma, I'm sure your sauce beats mine any day, but this definitely comes in at a close second.


Meatballs

2 pounds ground beef, 80% lean
5 egg whites
5 cloves of garlic, minced
1 whole onion, finely diced
1 large handful of Italian parsley, chopped
plenty of salt and pepper to taste
Olive oil for cooking

Sauce
1 can of Trader Joes Tuscan Marinara Sauce
1 whole onion, chopped
5 garlic cloves, roughly chopped
8 large basil leaves, torn by hand into sauce
1 pound of whole wheat spaghetti

*By using whole wheat spaghetti and lean beef I was really able to cut down on the calories. Now they have this awesome pasta at Trader Joe's with flax seed in it! So I can almost feel good about eating this meal...almost.*


1. Combine all the ingredients except olive oil in a bowl and mix well with hands.

2. Pour oil into a deep and preferably wide pot; let oil get hot.
3. One at a time, roll the meatballs into about 3 inch balls and drop them into the pot. Be careful not to crowd the pan. Continue doing so in batches until all meatballs have been browned on each side.
4. Remove all the meatballs on to another plate.
5. Turn down the heat to medium and add onion to pan. Toss onion with oil. Continue cooking for about 15 minutes.
6. Turn down the heat and add the garlic and the tomato sauce. Let it cook for about 30 minutes.
8. Boil a pot of salted water for the spaghetti.
7. Add in meatballs and juices. Continue cooking until meatballs are cooked through and moist, about 20 minutes.
8. Remove meatballs and add basil leaves and spaghetti to sauce. Toss to coat and pour extra sauce on meatballs and spaghetti!


*This sauce is a bit chunkier, if you prefer it smooth you can just smooth it out a bit with a stick blender.*

Wednesday, December 31, 2008

Lemon Tuscan Pasta with Herb Crusted Chicken


One of my favorite things to do is to figure out recipes from restaurants. Years ago, I used to work as a hostess at a local Houlihan's. My friends and I loved that place, so much that we ALL started working there! They used to have this one dish that we all loved, one of my friends, Yelena, would probablly have that dish as her last meal! She has been begging me to make this for her and I still keep promising her I will. I am just hoping that maybe this simple version of the dish will inspire her to make it on her own!

This pasta was creamy, lemony and very filling! It was one of our saddest days when they took it off the menu. So being the only cook out of all my friends, I decided to duplicate it. About 6 years ago I did it, I replicated the recipe. But it wasn't exactly the quickest thing in the world. Today, with the help of my favorite friend, Trader Joe, I was able to make a very quick and satisfying meal. With a few fresh ingredients I am able to wake up the flavors and make the sauce my own. Unfortunately, it's not the most diet friendly, so I threw in some whole grain pasta with flax seed to make up for the sauce.

*Ruth from Presto Pasta Nights will be hosting this recipe on her site! Check it out!*

Lemon Tuscan Pasta

1/2 pound spaghette or angel hair pasta
1 jar Trader Joes Alfredo Sauce (you can also use homemade if you have it)
2 tablespoons butter
3 cloves garlic, minced
1/2 an onion, finely diced
1/4 cup good Parmasan Cheese
zest off of 1/2 a lemon
juice of 1 lemon

1. Bring a large pot of water to a boil for pasta.
2. Once the water has come to a boil, start the sauce. On a very low flame add butter to a deep saute pan. Once butter melts add garlic and onion. Close lid and let the onion and garic "sweat" in the butter. You do not want any color on it. It needs to go very slow and just develop the flavors. *The smell of butter cooking with onions and garlic, has to be the best smell in the world! When my fiance' walked into the house and got a whif he was instantly excited about dinner!*
3. Once garlic and onions are translucent and very fragrant, add in your sauce and lemon zest. Scrape every bit of the sauce in, it tends to get stuck in the jar. Let it simmer just enough to get thick. At the very end add in the cheese and lemon juice. *Be very careful with the lemon juice! Do not add any acidity to a cream sauce while it is boiling. It will seperate and you will have a big globby mess! Add it in slowly, at the end.*
4. Once the pasta is done, add it to the sauce with tongs. Don't worry about the water from the pasta, it will combine nicely with the sauce.
5. Serve with a twist of lemon and a sprinkle of Parmasan Cheese on top.

Herb Crusted Chicken


2 lbs of chicken breast
seasoned Italian bread crumbs
1 egg
1 handful of Italian Parsley, finely chopped
zest off of 1 lemon
Olive oil to fry

1. Remove fat from chicken breasts. Cut the chicken breast in half horizontally. I hate pounding out chicken breasts, it scares my cat and frankly just makes too much noise. Instead, I just cut it in half and they get thin that way at the same time they make more portions.
2. In a plate, combine breadcrumbs with parsley and lemon zest.
3. In another plate scramble one egg with 1 tablespoon of water.
4. Preheat the pan on high and pour enough oil in the pan to come up about half way on the chicken.
5. Dip the chicken in egg and then in the breadcrumbs.
6. Fry until golden brown on each side. Lay out on paper towels to drain the fat.
7. Serve with a sprinkle of parsley.

Tuesday, December 30, 2008

Roasted Vegetable Lasagna


Between last week and this week I have been all screwed up with my meals! Because of the short weeks, it's tough to figure out what I should make for the week to eat. I was craving pasta like crazy, but wanted to keep it healthy. So I decided to go for lots of veggies and less pasta. I took the help where I could get it and used canned marinara sauce from Trader Joes, it tastes really great and has no additives in it. I had some frozen spinach and some of Trader Joes roasted eggplant and zucchini left over in the freezer. I cleared out some veggies I had in the fridge and roasted them up in the oven. I used Sargento 6 Cheese Blend with Mozzarella, Provolone, Parmesan, Fontina, Romano and Asiago. I did not have to use much and because of the Asiago and Parmesan it formed a beautiful crust on top.

It was actually very easy to eat this without feeling guilty! Typically I won't eat lasagna because it is loaded with fat and calories. But with this one, I did not put a thick coat of cheese on top and there was more veggies than pasta. I did use a lot of ricotta but that's a whey protein which is actually very good for you! It's also a really great way to get picky kids or a picky fiance', who doesn't like veggies, to eat plenty of vegetables, without them knowing it!
I gave it to him for lunch the next day and he called me up and said,
"Look babe, I expect a lot out of you with your cooking, but this was top notch! Restaurant quality! I don't even like lasagna! But this yum!"

To that I replied, "Well good, I'm glad that my $50,000 education didn't go to waste and I could still make restaurant quality lasagna!"

Roasted Veggie Lasagna

1 red onion, cut into large wedges
1 yellow pepper, cut into large chunks
1 red pepper, cut into large chunks
1/2 a package of Trader Joe's Grigliato Misto, or roast your own eggplant and zucchini
10 oz package of frozen spinach, defrosted
2 garlic cloves
2 tablespoons fresh basil, chiffonade
lasagna noodles
1 jar of marinara, store bought or homemade
12 oz ricotta cheese
1 bag of shredded cheese, about 2 cups
1 table spoon olive oil
salt and pepper to taste

1. Place cut up onion and peppers onto a sheet pan coated with olive oil and seasoning. Roast at 450 degrees until lightly brown in color, about 20-25 minutes.

2. Take vegetables out of oven and place in the freezer to cool them quickly. You don't need them cold, just cool enough to handle with your hands.
3. Cut up the roasted veggies into small pieces, including zucchini and eggplant. This is no place to get exact with your knife skills, just run your knife quickly through all the veggies.
4. Toss all roasted veggies with garlic and basil and preheat your oven to 350-degrees.
5. Take a 9X9 pan and coat it with pan spray.
6. Coat the bottom with a layer of marinara sauce.
7. Put a layer of lasagna noodles on the bottom. *A lot of stores now carry the lasagna noodles that don't need to be precooked in water. They are much easier to handle when they are not cooked and make it a much faster process.*
8. Place a layer of ricotta on top of the noodles. It does not need to be perfect, just use your hands to crumble it up, it will melt in the oven anyhow.
9. Place a nice layer of roasted veggies and spinach on top of ricotta. Don't be shy with the veggies.
10. Sprinkle an even layer of shredded cheese on top.
11. Repeat this until you get to the top.
12. Place in the oven, until the top gets brown in color, about 45 minutes.
*This lasagna is unique because of the crust formed on top from the cheese combination. Most other lasagnas tend to be gooey on top. This one has a really great combination of both gooey in the middle and crispy on top*

Monday, December 15, 2008

Trio of Flatbreads

Recently we were at a wedding and one of the appetizers they served was flat breads with smoked salmon and a garlic sour cream. I almost forgot how much I enjoyed those little things! They are crispy, crumbly and creamy all in one! I was going through some old cookbooks from a culinary class I took and stumbled upon a wonderful and simple flat bread recipe.
I had a bunch of stuff in my fridge that I wanted to get rid of. So this trio of flat breads kinda became my "everything but the kitchen sink" meal!
The dough proved to be very, very easy to make! It rolled out beautifully and I was able to keep it really thin. You don't have to worry about making it a perfect circle or a perfect square, the more rustic the shape the better! The recipe stated to put some herbs into the mixture. I used rosemary for all of them, but you can use whatever herbs you like.

Serves 4
1 3/4 cups unbleached all-purpose flour
1 tablespoon chopped rosemary
1 teaspoon baking powder
1/4 teaspoon salt
1/2 cup water
1/3 cup olive oil plus more for brushing
*Preheat oven to 450°F with a heavy baking sheet on rack in middle. I used a pizza stone instead.
Stir together flour, chopped herbs of choice, baking powder, and salt in a medium bowl.
Make a well in center, then add water and oil and gradually stir into flour with a wooden spoon until a dough forms. Knead dough gently on a floured work surface a few times.
Divide dough into 3 pieces and roll out 1 piece on a sheet of parchment paper into a 10-inch round. Make sure you cover the others with plastic wrap so they don't dry out.
Lightly brush top with additional oil and scatter small clusters of rosemary leaves on top, pressing in slightly. Sprinkle with sea salt. Slide round with parchment paper onto preheated baking sheet and bake until it is a pale golden color, about 8 to 10 minutes. Transfer flat bread to a rack to cool, then make 2 more rounds (1 at a time) on fresh parchment. Since I was making them right away with my toppings...I took out one of my oven racks ahead of time and used that as my cooling rack. That way, I could just assemble flat bread and stick them back in the oven.
*Flatbread can be made 2 days ahead. Just cool it completely, and keep it in an air tight container at room temperature.*

I made 3 different flat breads, Lorraine, Caprese and Thai Pork.
Lorraine:
;<img id="BLOGGER_PHOTO_ID_5280805381065078018" style="DISPLAY: block; MARGIN: 0px auto 10px; WIDTH: 320px; CURSOR: hand; HEIGHT: 240px; TEXT-ALIGN: center" alt="" src="https://blogger.googleusercontent.com/img/b/R29vZ2xl/AVvXsEiem2A2JQrwzAdsZGkkXgxQ-NbNcBpde30pyp6BMQfVMzejxe8kA9oVKUyfWU3LFIr0MK7otFGtbJ9tEkREbvvYDbiA0YqKi-gaFPXlS-n68mG0tJnTA4hqsqlvnMPuHS-hvTRqX93QSHo/s320/Marina's+Bday+016.jpg" border="0" />Anything with the word Lorraine in it has proven to be good! Bacon, caramalized onions and Swiss Cheese are the usual suspects in a really great Lorraine Quiche. Here you get the same great flavors without the fuss of a traditional quiche.
Olive Oil For Brushing Flat Bread
4 Slices of Bacon, Chopped
1/2 Large Onion, Chopped
4 oz Gruyere Cheese; Shredded (Any nice, sharp cheese will do)
Salt and Pepper for Seasoning
Put the bacon in a sautee pan and let the fat render. Once some fat has rendered, add the onions and season to taste. Brush the flatbread with some olive oil and the bacon and onion mixture on flatbread. It does not have to be perfect, just make sure that it is nicely covered. Add the cheese on top and place in a 450-degree oven for about 8-10 minutes, until the cheese is all bubbly and melted. Use a pizza slicer or a large knife to cut into pieces. Cut immediately after it comes out so that it does not dry out.


One of my favorite salads to eat in the summer is a Caprese salad. There's something about the thinly sliced tomato, fresh mozzarella and fragrant basil, that makes you feel like you are in a vineyard in Italy. This flatbread turned out with the same vibrant flavors and proved to be my favorite of all three.
Olive Oil For Brushing Flat Bread
1/2 a Tomato, thinly Sliced into half moons
4-5 ounces of Fresh Mozzarella, sliced
A Handful of Roughly Chopped Italian Parsley
*Traditionally in a Caprese, basil is used, however, I ran out of basil, but had plenty of parsley, and since parsley is used so frequently in Italian cooking, it was the perfect substitute.
Brush the flatbread with some olive oil and place tomatoes on top. Place the slices of cheese on top, making sure to cover all surface area. Sprinkle with basil leaves or in this case parsley.
Place in the oven for and place in a 450-degree oven for about 8-10 minutes, until the cheese is all bubbly and melted. Use a pizza slicer or a large knife to cut into pieces. Cut immediately after it comes out so that it does not dry out.


Thai Pork Flat Bread:</u>;</div>
Last week I made some Asian Pulled Pork in my crockpot (that recipe will be on another topic). I had a bunch leftover and had no clue what to do with it. So I froze some of the pork and the rest I used on this flatbread. I added some cilantro leaves and chopped up baby bok choy. Then I drizzled some seasame oil and sesame seeds on top to give it some character. After 8 minutes in the oven it came out looking absolutely perfect. The sauce from the pork melted into the rest of the ingredients and blended everything perfectly.

These little flatbreads were perfect for a night when you want to get your creativity going!