Friday, December 30, 2011

Musings of a Noviy God...My Memories from our Russian New Year'sEve...


"All is quiet in my house, nothing stirs...not even a mouse" only the quiet hum of the aquarium filter can be heard...I am the only one awake...playing with the little "Ded Maroz" (Father Frost) under our New Year's "yolachka" (Christmas Tree)trying to conceal the excitement bubbling out of my 40 pound body for the night ahead. It's the only night when even children are allowed to stay up with the adults and enjoy the festivities of the coming year.
It's December 31st 1988 on a usually snowy day in my homeland...Russia. The streets are bustling with people getting last minute treats for their elaborate New Year's Eve feasts...traffic roars down busy streets as people rush home for their naps. That is precisely what was happening at my house. All the adults were fast asleep getting their much needed sleep in preparation for a night filled with laughter, drinking and celebration. Much like our dinners New Year's eve has become a marathon of food and drink. Memories, tales and shots are shared much into the early mornings...until all the crumbs from the dining room tables are cleared and replaced with steaming cups of tea and coffee and plates of freshly made omelettes with butter. After a 12 hour marathon the survivors return to their homes to freshen themselves up for Day 2 of celebration: New Year's Eve; a repeat of Day 1...more memories, more tales, more food, more vodka.

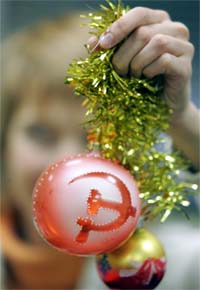
In Russia New Year's Eve is as big as Christmas is in the states. Christmas and God Forbid, Hannakuh were not to be found on any calander. Instead, New Year's Eve was lavishously celebrated. Houses displayed their sparkling and tinsle-wrapped yolachka's, our version of Christmas Trees, in their windows proudly. Everyone gives each other presents and goes to see New Year's Eve plays featuring our non-controversial version of Santa Claus, Ded Maroz or Father Frost and his usually much younger sexy, scantilly clad assistant "Snegurachka".


I still remember our beautiful "yolachka". A real tree, that still smelled of pine cones and frost. We had the most gorgeous ornaments that were hand-made and each one had its own personality. My dad and I would decorate the tree together, my favorite part was spreading the cotton "snow" under the tree bottom. We laid "Ded Maroz" and "Snegurachka" figurines into the "snow" along with tinsle, toy trains, presents and all the other ornaments that never made it onto the tree. Countless hours were spent playing under that tree, wondering which presents were for me, dreading the moment we would have to put the tree away.

My mom would race around putting her last touches on her lipstick and her napoleaon cake. I would run right behind her, reluctant to miss any of the New Year's preparation. My dad, always the last to wake up from his nap, would walk around lazly trying to find his missing tie, annoying my mother with his constant requests to help him find yet another mysteriously missing article of clothing.

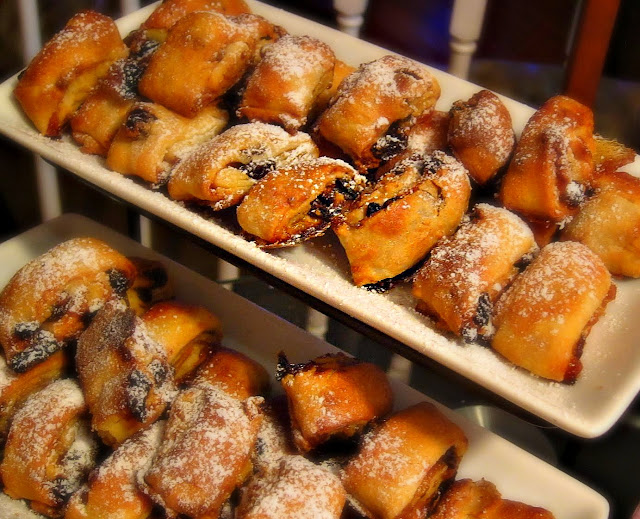
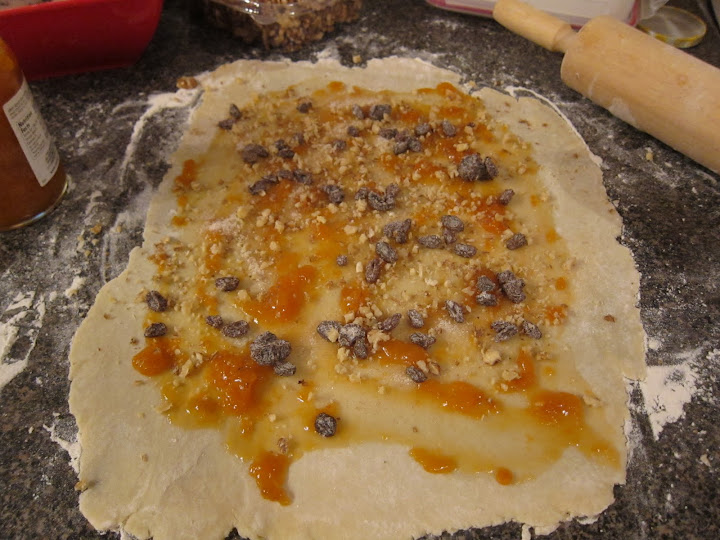
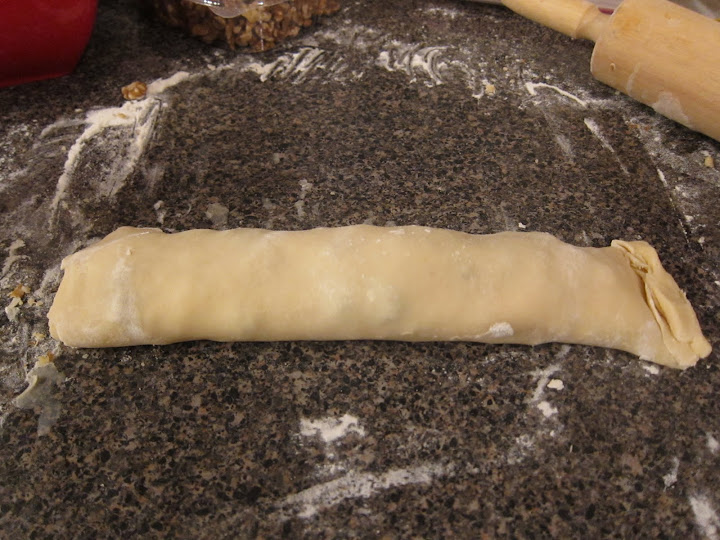
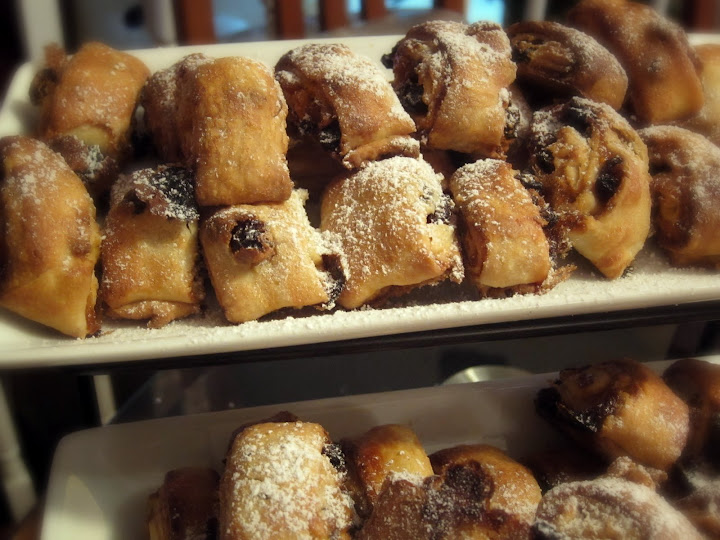
Somehow at the end of the night everything settled down...a decadant spread of appetizers, meats and desserts awaited us. A feast to fuel the busy night ahead of games, skits, songs and dancing. A night that Russians feel united in their love for celebration and food; for laughter and stories; for a good tale over a cold shot.

As an adult, I try and recreate that magic that I felt as a kid on New Year's Eve. But alas, that tingle in the stomach is unique to a child's soul and cannot be re-created but instead will hopefully be reincarnated...a wish for my own future children...a hope that they will enjoy this amazing holiday as I once did...and that my little ones will tail me around the house as I crazily rush around putting the finishing touches on my lipstick and desserts. In the meantime, I will go and drink my cold shot and laugh over memories with my friends.

A Happy and Healthy New Year to Everyone!!!

Thursday, December 29, 2011

Caldo de Pollo...Mexican Chicken Soup with Tortilla Toast


A blazing sun shines brigtly through the curtains, neighbors greet each other as they put their finishing touches on their Christmas lights, children race to their homes to catch a glimpse of their Christmas presents...a beautiful vision, stifled by my non-stop sneezing and sniffling. A miserable Christmas day ensued for me, that I was sure of. After 4 hopeless days of lying on the couch with my husband I craved homemade soup. Unfortunately, due to our contagious colds my husband and I were quarantined in the house, completely out of touch with anyone who could bring us homemade comfort food. We suffered with take out food...ok suffered is a bit dramatic...settled is more like it...oh who I am kidding! We relished each bit of sushi, pizza, gyros, burgers...that is until the fourth day...by the fourth day I was done. I wanted...I DEMANDED homemade food. I nudged my husband and looked as pitiful as possible...useless I thought...he does not know how to make comfort food...So we sat on the couch and continued to pig out on the last bits and bites of pizza and found comfort only in Afrin.

By the fifth day of laying on the couch, I had somehow gotten some energy back and decided that my body needed soup...chicken soup cures all sniffles. I needed chicken soup...chicken soup with a kick. All ethnicity have their version of a chicken soup, I am personally a huge fan of this one. It's simple and has a great kick that will blow through any sniffles. Two bowls of soup and one box of tissues later, I felt renewed. I walked away from my stove feeling a lot better and a little bit prouder...sniffle, sniffle, sniffle.

Caldo de Pollo...My Way

1.5 Pounds of Chicken Drum Sticks
5 Carrots, Sliced into Half-Moons
1/2 Large Onion, Diced
3 Stalks Celery, Sliced
5 Garlic Cloves, Minced
1 Jalapeno, Seeded and Diced
3 Large Red Potatoes, Diced
1 Bunch of Cilantro, Roughly Chopped
4 Knorr's Caldo de Pollo Cubes *This is the secret to this soup. Every Mexican woman who I had worked with, told me that every good Mexican housewife keeps this in the back of her cupboard as her secret weapon. Be careful it they are high in sodium so make sure to taste the soup to ensure that it's not getting too salty*
1 Tsp Better Than Bouillion
1 Tsp Turmeric *This is MY secret weapon...it gives the soup a healthy yellow color without much flavor. People will think your soup was cooking for days after they see the gorgeous golden color.*
4 Whole Wheat Tortillas
Olive Oil for Brushing or A Misto Spray
8 cups Water


1. Place chicken into a pot and cover with water. Bring to a boil and then immediately lower to a slow simmer. Skim off all the skum off the top.


2. Once the soup is clear, add in all the vegetables and flavorings; everything except the cilantro, that comes into play later. Turn the soup down to a medium low and let it simmer, very, very gently. Taste the soup for proper flavor as it cooks and adjust as see fit. Simmer, for about 45 minutes or until desired flavor is achieved.
3. Preheat the oven to 450-degrees.
4. Place the tortilla rounds on a sheet pan. With a pastry brush, rub some olive oil onto them.
5. Place in the oven until golden brown and crispy.


6. Garnish soup with chopped cilantro. Serve soup with tortilla toasts, avocado, limes and diced fresh onion. Slurp. Enjoy. Repeat.


Wednesday, December 28, 2011

Turchicken Chili...The Perfect Chili


Chili...as American as Apple Pie...Mac and Cheese and Chicken Noodle Soup...Craved by some loved by many, this perfect meal can be the cure for the common cold, the next day hangover, the winter blues or dozens of other common ailments. And as many cures as it boasts that's how many different varieties and recipes there are all over the country. The history of chili is still a bit unknown but the one common fact that is known is that it was NOT born south of our borders.

The most common tales speak of hungry cowboys with not much meat or desirable meat parts to spare. Being so close to the southern border plenty of spices and chiles were available to cook down the stringy and scarce meets down to a delicious and hearty stew. The name chili came from the use of different chilis used as flavorings in the beanless stew. That's right...beanless...a true Texan chili is without beans or tomatoes. In fact it's essentially a spicy stew...and by the way did you know that the national state food of Texas is chili? So do not go around Texas hoping to find yourself a nice bowl of chili with beans and tomatoes...most likely you will be laughed at by a cowboy hat clad Texan and gently ushered out of the state.

No one really knows - while there are a lot of controversial stories - of where and when the beans came into the picture, I will loudly proclaim (Texans please spare me) that I love a nice chili with BEANS! That being said...I have spent years trying out a variety of chili recipes...with peppers and without...with tomato sauce and without...with searing the meat and without...you will notice that this is the first and only chili recipe I have posted - with darn good reason. I never found a recipe before that I wanted to stamp my name on. Until my most recent attempt. Being a hard core proteinarian these days I need to shove as much healthy protein into my shrinking body as possible. (More on this in another post). So I started looking for a way to pack more protein and flavor punch into my chili...

I came across thousands of chili recipes on the net and in all my cookbooks, none of which really excited me. I wanted a chili that I would crave day after day...I wanted a chili that made me cry out "ye-haw!' while waving my cowboy hat in the air! (yes I have one...don't judge) And by some streak of dumb luck and laziness...I did it...I created the perfect chili for me. It was healthy, it had a killer protein punch and it was delicous. The perfect combination of flavors in this chili is thanks to the use of both chicken and turkey (get it- turchicken chili?) With tons of lean mean and beans this chili will prove to be the perfect dinner for any health nut... or rural cowboy. So get the crockpots out...put on your cowboy hats and scream "YAHAWWWWWW" this chili is here to stay!

Turchicken Chili

1 Pound of 97% Lean Ground Turkey
1/2 Pound Boneless Skinless Chicken Thighs
1 15 Oz Can Diced Tomatoes with Jalapeno, Oregano and Onion (or similar)
1 15 Oz Can Diced Tomatoes with Italian Seasoning
1 15 Oz Can Chili Style Beans
1 15 Oz Can Kidney Beans, rinced and drained
1 Spanish Onion, Diced
1 Jalapeno, Seeded, Minced
4 Garlic Cloves, Minced
1 Packet of Chili or Taco Seasoning
Sour cream, sliced scallions and shredded cheese to be used for garnish
Olive Oil

1. Coat a pan with olive oil and sear the ground turkey until golden brown; about 10 minutes. *While turkey is cooking chop up your onions, jalapeno and garlic.*
2. Add all the ingredients and HALF of the seasoning packet into a crockpot. Cook on low for 6 hours.
3. After the first 2 hours, remove the chicken thighs and shred with two forks. Add back into the crockpot and continue to cook.
4. Taste for seasoning; if need more seasoning add in the remaining seasoning packet, tasting as you go as to not to over season.


Wednesday, December 14, 2011

BBQ Chicken Flatbread Pizza


I love cooking for my husband. He has a hearty appetite and is a very honest critic of my food - which can lead him down the wrong path might quickly... When I asked what he wanted for dinner on a cold Friday night, he said " make me something crispy, gooey and cheesy.". Quite the combination to ask for on the night when the fridge is running low on pretty much everything except condiments and leftovers, (some of which are questionable). I had a little bit of roasted chicken breast left, some random herbs and a pantry full of miscellaneous items. The perfect concoction popped into my head once I saw my Costco size bottle of BBQ sauce.... Flatbread Pizzas!!!! Crispy... Cheesy.... Gooey.... Perfect combo not to mention super easy! This recipe literally took me all of 30 minutes to make and really put a smile on the hubby's face. I thought this was very close to the BBQ Chicken Pizza at California Pizza Kitchen and therefore patted myself on the back for a job well done :)
The BBQ sauce plays a very crucial role in this dish. I strayed from my usual Sweet Baby Ray's and chose to go with Masterpiece BBQ sauce, it was both tangy and spicy, precisely what I wanted for the pizza. Gooey, Cheesey, Tangy, Crispy...Perfect for our Friday night on the couch.

BBQ Chicken Flatbread Pizza

The flatbreaf recipe is an oldie but a goodie that I used 2 years ago in one of my other recipes. You can find some of my other recipes that I made with them here .

Serves 4 as an appetizer or 2 as an entree

Flatbreads

1 3/4 cups unbleached all-purpose flour
1 tablespoon chopped rosemary
1 teaspoon baking powder
1/4 teaspoon salt
1/2 cup water
1/3 cup olive oil plus more for brushing
*Preheat oven to 450°F with a heavy baking sheet on rack in middle. I used a pizza stone instead.

2 Cooked Chicken Breasts, Shredded, tossed in 1/2 a cup of BBQ Sauce of Choice *I had left over chicken breasts, use whatever kind you have on hand, or just roast some up with salt and pepper and olive oil in the oven*
1 Cup Good BBQ Sauce
1 Red Onion, Sliced
2 Cups of Shredded Cheese * I used a Pepperjack Cheddar Mix, Italian blend would work well too*
1 Bunch Cilantro, Roughly Chopped

1. Stir together flour, chopped herbs of choice, baking powder, and salt in a medium bowl.
2. Make a well in center, then add water and oil and gradually stir into flour with a wooden spoon until a dough forms. Knead dough gently on a floured work surface a few times.
3. Divide dough into 3 pieces and roll out 1 piece on a sheet of parchment paper into a 10-inch round. Make sure you cover the others with plastic wrap so they don't dry out.
4. Lightly brush top with additional oil and scatter small clusters of rosemary leaves on top, pressing in slightly. Sprinkle with sea salt. Slide round with parchment paper onto preheated baking sheet and bake until it is a pale golden color, about 8 to 10 minutes. Transfer flat bread to a rack to cool, then make 2 more rounds (1 at a time) on fresh parchment.
5.Since I was making them right away with my toppings...I took out one of my oven racks ahead of time and used that as my cooling rack. That way, I could just assemble flat bread and stick them back in the oven.
*Flatbread can be made 2 days ahead. Just cool it completely, and keep it in an air tight container at room temperature.*
6. Once flatbreads are cooked and cool to handle you can assemble the flatbreads. Shmear BBQ sauce on the flatbreads with a pastry brush. A nice layer to cover all the bubbling nooks and crannies will do.
7. Sprinkle 1/3 of shredded chicken, 1/3 cheese and (yup you guessed it) 1/3 of the sliced red onions on the already shmeared flatbread.
8. With a spoon, drizzle a bit more BBQ Sauce on the flatbread (hey they don't call it BBQ Pizza for nothin')

9. Place into the preheated oven for 10 minutes, or until cracklin and bubblin!
10. Sprinkle with plenty of cilantro and serve!

Wednesday, November 16, 2011

Dreams Of Rugelach


I admit...I CAN bake...it's just I do not always want to...But there is that one dessert that I make that is truly MY dessert. Everyone asks for MY recipe...Everyone doubles over in delight after eating MY creation...Everyone gains about 2 pounds after eating MY dessert.

This is how this magical dessert was born...
I was unemployed...depressed and bored. I was sitting on the couch, doing nothing more than watching the Food Network. Ina Garten comes on screen and starts making these amazing little cookies. My ears perked up and my mouth started salivating. "I can do this," I thought. Reluctant to fail, I followed the recipe to a T. However, when the dough was not ending up quite how I like it, I tweaked it a bit. And they ended up AMAZING! I ate ten myself and I decided these posed a major threat to my figure! I passed the delicious little love handle makers to my husband and told him to take them to work the very next day.
At 10am the next day I get a phone call from a crazed best friend. She said her husband told her he had eaten the most amazing cookies that my husband brought into work and that I must make more! So I made more and invited her over. She drove over in an hour and was eating them still hot. The sweetest thing she said was, "It's like you put something in them that makes them absolutely irresistible! I cannot stop eating them." The following day her father-in-law tasted them...and chaos ensued! They all literally sat with their hands folded at the table and waited for my fresh batch of cookies for hours and immediately devoured them!
So now I finally pass them on :) I use the recipe below as more of a guide than anything else. Most rugelach look like little crescents. I shape mine a little differently because it's easier to cut them.
As far as the preserves goes, I have used everything from apricot, to strawberry to cherry. I personally enjoyed the strawberry, but in my kitchen everyone is a critic and the vast majority prefer the apricot.
The beauty of these little cookies is how versatile they are. Make them as I do or make them yours...whatever it is share them...it's a sin not to...


Rugelach


8 ounces cream cheese, at room temperature
1/2-pound unsalted butter, at room temperature
1/4 cup granulated sugar plus 9 tablespoons
1/4 teaspoon kosher salt
1 teaspoon pure vanilla extract
2 cups all-purpose flour
1/4 cup light brown sugar, packed
1 1/2 teaspoons ground cinnamon
3/4 cup raisins
1 cup walnuts, finely chopped
1/2 cup apricot preserves, pureed in a food processor
1 egg beaten with 1 tablespoon milk, for egg wash

*You can double this recipe and save the dough in the fridge for a week for a rainy day*

Directions
Cream the cheese and butter in the bowl of an electric mixer fitted with the paddle attachment until light. Add 1/4 cup granulated sugar, the salt, and vanilla. With the mixer on low speed, add the flour and mix until just combined. Dump the dough out onto a well-floured board and roll it into a ball. Cut the ball in quarters, wrap each piece in plastic, and refrigerate for 1 hour. *I have also used a food processor to make the dough and it worked great.*
To make the filling, combine 6 tablespoons of granulated sugar, the brown sugar, 1/2 teaspoon cinnamon, the raisins, and walnuts.

On a well-floured board, roll each ball of dough into a 9-inch circle. Spread the dough with 2 tablespoons apricot preserves and sprinkle with 1/2 cup of the filling. Press the filling lightly into the dough.


Roll up the dough carefully like a jelly roll, making sure to tuck the corners under.


Cut into 2 inch pieces and place face up on a baking sheet lined with parchment paper. *Make sure you use parchment paper, when the jam boils out it creates a sticky mess*
Chill for 30 minutes.

Preheat the oven to 350 degrees F.


Brush each cookie with the egg wash. Combine 3 tablespoons granulated sugar and 1 teaspoon cinnamon and sprinkle on the cookies. Bake for 15 to 20 minutes, until lightly browned. Remove to a wire rack and let cool.
*Sometimes it takes longer for the cookies to bake. Just monitor them carefully.*


Tuscan Mussles and Shrimp


Very few things in life give me as much pleasure as putting a smile on people's faces with my food. Particularly, my husband's face :) Those days that he is down and out and needs a pick me up...I know the shortest distance is to his stomach! 90% of the time this remedy calls for seafood; my husband’s favorite food of all time. I was on the phone with my husband shopping at my favorite grocery store when I noticed that he was not in a particularly pleasant mood. I knew this called for an arsenal of seafood!
This particular dish I made on a warm September afternoon. I wanted to make him something healthy yet still allow him to feel like he indulged. The dishes’ simple flavors combine and form an incredible broth perfect for dipping a whole wheat crostini into.

Tuscan Mussels and Shrimp
* Like all seafood mussels can be extremely dangerous if they are not fresh. Sorting through them is crucial. Stick them under cold running water and pick through, discarding any shells that refuse to close. If they are open then they are already dead. Scrub the remaining ones with a sponge to remove any access dirt. They all have a grassy looking "beard" attached to their shells, tear that off as well.*

1 Pound of Mussels, Washed and Sorted
6 Large Shrimp; Shells and Veins Removed
4 Large Garlic Cloves; Minced
1 Shallot Diced Finely
Juice of Half a Lemon
3 Scallions Sliced on the Bias
2 Tablespoons Chopped Parsley
1 Cup of Wine
1/2 Cup Canned Diced Tomatoes
1 Pinch Red Pepper Flakes
2 Tablespoons Olive Oil
2 Pieces of Whole Wheat Bread, Toasted, Rubbed Down with Garlic Cloves
Salt and Pepper to Taste


1. In a wide and deep pot combine olive oil, shallots, garlic and red pepper flakes. Allow to sweat for a couple of minutes until fragrant and transparent, but not brown.
2. Add in shrimp and sautee for two minutes.
3. Add in mussels, white wine, tomatoes, lemon juice and scallions; toss everything to combine. Cover with tight fitting lid and allow to cook for 4 minutes untouched.
4. Remove lid and move everything around, if all the mussels are opened, poor into a deep bowl, sprinkle with parsley and serve with toasted bread!
Dip, slurp and enjoy!

Thursday, August 25, 2011

Moroccan Chicken with Whole Wheat Cous Cous


I thought long and hard about what I should have as my first recipe after my long hiatis. I needed it to be something easy, comforting, delicious and most importantly healthy.
My mother-in-law initially introduced a version of this dish to me. While it was delicious I still felt it needed some more flavors to really make it a star. This dish is truly a perfect explosion of flavor on the palette. It’s spicey, sweet, tangy and most importantly delicious. Pair it with a super easy whole grain cous-cous and you are on your way to a wonderful dish inspired by all the flavors of the Middle East.
As the cooler weather threatens to sneak up on us at any moment...I find myself going back to my plethora of recipes and reaching for things that are ooey gooey and warming. Naturally, those are the typical recipes that also add some unnecessary layers of fat to our warmth-hungry bodies. And so this is where my fight for the healthy and the comforting begins. I want to reach for my pasta pot and create a mind blowing concoction of pasta, pancetta, cream and chicken…but that is reserved for special occasions when the calories disappear for just one meal. For now, we need something that will warm our souls and feed our grumbling stomachs. For now, we remember that food is there to nourish us not solve our problems. For now we sit down at the table with our families, friends and loved ones and share a scrumptious meal that inspires stories and tales of other worlds, distant travels and happy endings…at least that’s what I hope for with every meal.

Moroccan Chicken

2 Pounds of Boneless, Skinless Chicken Thighs or Chicken Breast; Cut into Large Pieces
¾ Cup Dried Apricots, Roughly Sliced
¾ Cup Dried Prunes, Roughly Sliced
1 Spanish Onion, Diced
3 Tablespoons Balsamic Vinegar
2 Tablespoons Cilantro, Roughly Chopped
Juice of One Lemon
1 Tablespoon Olive Oil
3 Garlic Cloves, Minced
1 One-Inch Piece of Ginger, Minced
1 Tablespoon Smokey Paprika
1 Teaspoon Ground Cinnamon
1/8 Teaspoon Ground Nutmeg
1 Teaspoon Cumin
1.5 Tablespoons Turmeric *The turmeric gives this dish its distinct yellow color*
½ Teaspoon Sumac (optional)
½ Tablespoon Salt
1 Tsp Pepper
Pinch of Red Pepper Flakes

-Preheat oven to 450-degrees F. Spray down a casserole pan of choice.
-While the oven is preheating combine chicken thighs with turmeric, cumin, nutmeg, cinnamon, paprika, cumin, ginger, garlic, salt pepper, lemon juice, balsamic vinegar and cilantro. Toss in a bowl to combine and let stand for at least 20-30 minutes or even overnight.
-In a separate pan, combine onions, red pepper flakes with olive oil and sauté until golden; about 10 minutes.
-Add in dried fruit and mix to combine. Let cook for 10 minutes.
-Place chicken mixture and onion mixture into oiled casserole dish. Mix well to combine and distribute evenly.
-Cook uncovered for 15-20 minutes or until meat is tender and cooked through.

Whole Wheat Cous Cous


I always buys Trader Joes Cous Cous and just follow the package instructions.

I'm Back...With a New Plan

It's been a little bit of a hiatis...In between my new job, getting married and staying on top of all my other activites...My blog took a backseat to my life. Until one very fine day, I realized how much I missed that special time I set aside to write about my cooking adventures in the kitchen.
However...now I have taken a slightly different approach...while I love food and I love to cook delicious buttery cuncoctions, per my culinary education...I know that we as a society in America have developed a scary obesity epidemic. Diabetes and heart disease is on the rise in adults and young children alike. So I decided what better way to help this on-going fat battle then to create delicious and healthy recipes that will allow me to make a change in the way we live.

So come along with me and cook your way to a healthier you!!!